Showing posts with label entree. Show all posts

Thursday, March 15, 2012

Italian Meatloaf

Throughout my cooking career, I've had limited success with meatballs, trying multiple recipes.  Some were tastier than others, and many fell apart while simmering in tomato sauce.  Forming and frying or baking meatballs is also time consuming.  Then I stumbled on the idea of Italian meatloaf--meatball flavor with the ease of a loaf!

The recipe that follows is my take on the Italian meatloaf from Desperation Entertaining and  a recipe for meatballs in Sunday gravy created by Cook's Illustrated.

Italian Meatloaf
2 slices hearty white sandwich bread, cut into 1/2 inch cubes
1/2 cup buttermilk
1/4 cup chopped fresh parsley (more or less)
2 cloves garlic, crushed
1 egg yolk
1/4 tsp crushed red pepper
1/2 tsp Italian herb mix, optional
1 # ground beef, 93% lean
1-2 ounces prosciutto, chopped fine
1/2 cup grated Parmesan cheese
1/3 cup onion, minced
pasta sauce, optional
  • Combine bread cubes, buttermilk, parsley, garlic, egg yolk, and spices.  Mash with a fork until no bread chunks remain.
  • Add ground beef, prosciutto, Parmesan, and onion.  Mix gently but thoroughly with your hands.
  • Pat mixture into a pan, cover with optional pasta sauce, and bake at 350 degrees until cooked through, about 30 minutes.
Notes:
  • Use a high quality sandwich bread, like Arnold Country White or Pepperidge Farm Farmhouse Hearty White.
  • The Italian herb mix is optional.  You can wing it by combining oregano, basil, marjoram, thyme, and/or cracked rosemary.
  • I usually prepare this recipe times six (6# meat).  I'll bake 1/3 and freeze the rest (raw) in two separate gallon freezer bags.  I freeze them flat on a baking sheet so they'll store neatly and thaw quickly.
  • If you try this x6, you'll have plenty of egg whites left.  Here's a source of ideas in case you want to use the whites instead of tossing them:  recipes.
  • Prosciutto is expensive and flavorful, so I usually use the smaller amount listed.
  • For best results, buy the tastiest Parmesan you can afford.  Real cheese is so much better than what comes in a can!
  • If you're making a big batch, the food processor can be a huge help.  Use it to grate the Parmesan, if needed.  The parsley should be chopped next, followed by (in any order now) the onion, garlic, and prosciutto.
  • At the bottom of this post I've typed in the ingredient amounts needed for a x6 batch.
  • If you use more than 1# of meat, your loaf will of course take more than 30 minutes to bake.  If you're in a hurry, shape it into a ring instead of a slab:
Buon Appetito!

Italian Meatloaf x6
12 slices hearty white sandwich bread, cut into 1/2 inch cubes
3 cups buttermilk
1 1/2 cups chopped fresh parsley (more or less)
12 cloves garlic, crushed
6 egg yolks
1 1/2 tsp crushed red pepper
1 Tbsp Italian herb mix, optional
 6# ground beef, 93% lean
6-12 ounces prosciutto, chopped fine
3 cups grated Parmesan cheese
2 cups onion, minced
pasta sauce, optional

Friday, February 17, 2012

In a Hurry?

Try forming your dinner into a shape that bakes more quickly!
Coming soon?--a recipe for Italian meatloaf.

Sunday, June 5, 2011

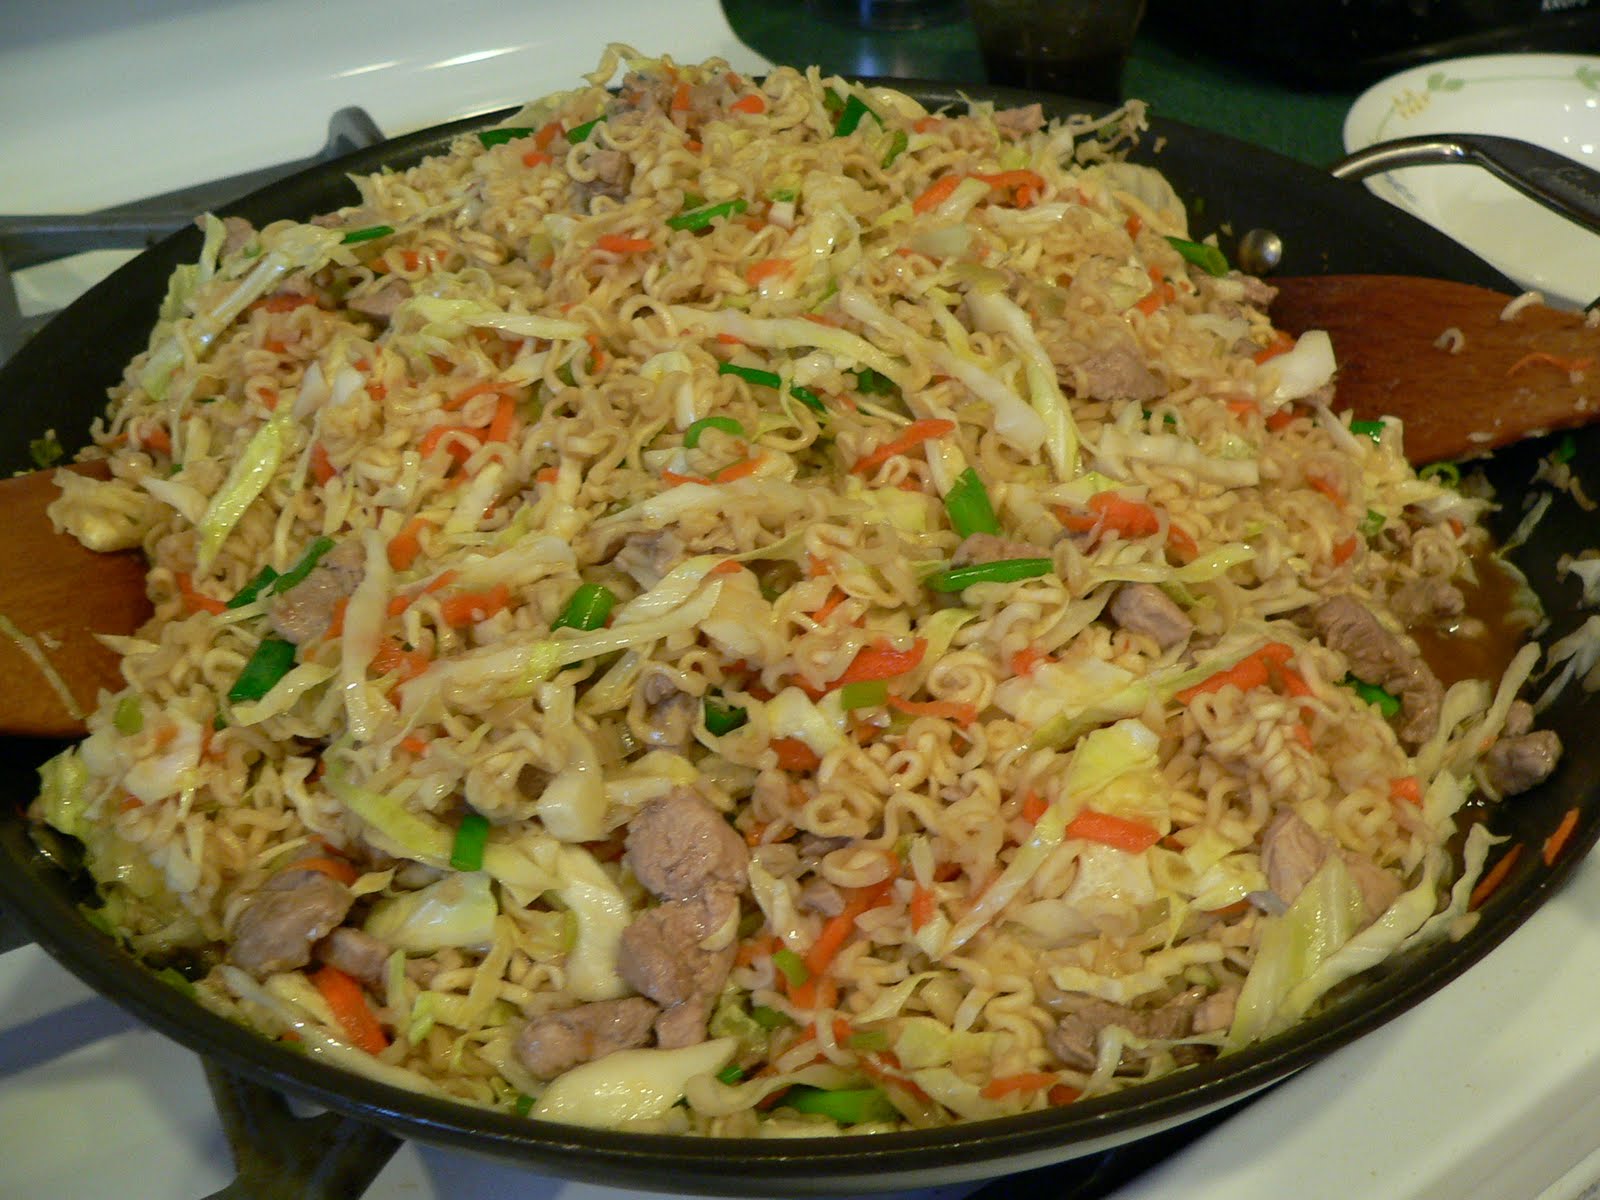
Pork Lo Mein

I prefer to borrow cookbooks from the library and test-drive them before buying my own copies.  The Best Skillet Recipes, from Cook's Illustrated, is a keeper.  Several recipes have become family favorites, including the cherry cobbler and pork lo mein.  Here's my slightly adapted version of the latter. 
Like all stir-fries, this entree is quick to toss together IF you've got your ingredients prepped and ready before you heat up your skillet.  Speaking of which, a word about equipment: 

CI points out that a wide skillet is better than a wok for American stoves.  More food comes into contact with the heat, making for better browning and quicker cooking.  Once I read that, my stir fry frustrations made so much sense!  No matter how I turned my flame, the food never cooked quickly enough in my old wok, often simmering in juices rather than frying.  Anyway, try a skillet!  For this recipe, use one with a 12" diameter.

I'll write the "serves 4" version of the recipe, although it should be enough for 6 people.  If my whole family is home (8), I'll prepare 1 1/2 batches (in a deep 13" skillet) and we end up with leftovers.

Pork Lo Mein, adapted from The Best Skillet Recipes
1# pork tenderloin, trimmed and sliced into thin strips
8 tsp low-sodium soy sauce, divided
2 Tbsp vegetable oil
12 medium scallions (~2 bunches), white and green parts separated, both parts sliced on the bias into 1" lengths
6 medium garlic cloves, minced or pressed (~2 Tbsp)
1 Tbsp minced or grated fresh ginger
1/8 tsp crushed red pepper flakes (or to taste)
3 1/2 cups low-sodium chicken broth
4 (3 oz) packages ramen noodles, seasoning packets discarded
2 Tbsp oyster-flavored sauce
2 tsp-2 Tbsp toasted sesame oil
1/2 # green cabbage (~1/4 medium head), cored and sliced thin
1-2 carrots, coarsely shredded (optional)

Set out your ingredients.  Pat the pork dry with paper towels and toss with 2 tsp of the soy sauce.
Scallion whites get their own bowl.  After typing the list above, I now realize I cut these too small!
Garlic, ginger (those are not slices--read about it in the notes), and red pepper flakes:
Oyster-flavored sauce, sesame oil, and the remaining 2 Tbsp soy sauce:
Cabbage, scallion greens (cut properly here), and optional carrot shreds:
(There's more cabbage in the above container than the recipe calls for because I double it to make the lo mein a one-dish meal.)

Heat 1/2 Tbsp of the oil in a 12" nonstick skillet over high heat until just smoking.  Add half the pork, break up any clumps, and cook without stirring until beginning to brown, about 1 minute.  Stir the pork and continue to cook until cooked through, 1 minute longer.  Transfer the pork to a bowl, cover to keep warm, and set aside.  Repeat with the remaining pork.
Add the remaining 1 Tbsp oil to the skillet and return to medium-high heat until shimmering.  Add the scallion whites and cook until lightly browned and softened, about 3 minutes.  Stir in the garlic, ginger, and red pepper flakes and cook until fragrant, about 30 seconds.
Stir in the broth.  Break the bricks of ramen into small chunks and add to the skillet.  Bring to a simmer and cook, tossing the noodles constantly with tongs or wooden paddles to separate, until the ramen is just tender but there is still liquid in the pan, about 2 minutes.
 (Cook a little more than this picture shows before moving on to the next step.)
Stir in the sauce ingredients and the remaining vegetables.  Cook until the cabbage is wilted and the sauce is thickened, about 1 minute.  Return the pork, along with any accumulated juices, to the skillet and cook until warmed through, about 30 seconds.
 Serve.  Enjoy!
Notes:
  • I double the cabbage to make this a one-dish meal.
  • The optional carrots add a bit more nutrition and a spark of color.
  • I typically buy a large package (4-6#) of pork tenderloin at the warehouse store.  I'll cut it all up, packing 1 or 1 1/2# allotments into freezer bags.  It's so handy to have the meat on hand and ready to go.
  • I keep processed ginger in my freezer, too.  It's a small time investment that saves me waste and time.
Here's the short-hand version:
Prep:
  1. pork with 2 tsp soy sauce
  2. scallion whites
  3. garlic, ginger, red pepper flakes
  4. scallion greens, cabbage, carrot
  5. oyster sauce, sesame oil, 2 Tbsp soy sauce
Cook pork in batches.  Set aside.
Fry scallion whites until softened.  Add garlic, etc. and stir until fragrant.
Add broth and ramen.  Cook until tender but some liquid remains.
Add sauce and vegetables.  Cook until cabbage is wilted and sauce is thickened.
Add pork, warm through, and serve.
Enjoy!

Thursday, March 17, 2011

Glazed Corned Beef

We always eat corned beef and cabbage on St. Patrick's Day.  My family enjoys it so much I could serve it more often; I usually manage just once or twice more a year.  My favorite treatment comes from Mable Hoffman's Crockery Cookery.  The meat is simmered in a crockpot, then brushed several times with a molasses-based glaze as it finishes in the oven.  Delicious!

Glazed Corned Beef, lightly adapted from Mable Hoffman's Crockery Cookery

1 (3 1/2 to 4#) corned beef brisket (flat cut is best)
2 Tbsp prepared mustard (I use Dijon)
1 1/2 tsp horseradish
2 Tbsp red wine vinegar
1/4 cup molasses
  • In a slow cooker, cover the corned beef with water.  Cook on low 10-12 hours or until tender.
  • Drain the corned beef.  Gently remove the external fat layers.  Place the meat in a baking dish covered with heavy duty aluminum foil.
  • Combine the remaining ingredients and brush on all sides of the meat.  Bake at 400, brushing with the sauce several times, about 20 minutes or until the beef begins to brown.  Cut across the grain.
Today I oh-so-gently simmered the corned beef on top of the stove for most of the day.  The 7# slab I bought was still partially frozen, so I didn't want to risk the slowness of the crockpot.  Besides, it's easier to cook the cabbage in the flavored broth already in a cooking pot instead of trying to transfer that liquid from the slow cooker.

Our traditional Irish dinner has always included cabbage, potatoes, carrots, and soda bread.  I've usually boiled all the vegetables, but admittedly they end up tasting pretty bland.  This year I briefly simmered only the cabbage in the corned beef broth, and it picked up a lot of flavor (more than usual--because the stock was made on the stove?).  The carrots were glazed with brown sugar and lemon juice, and I fried the potatoes with onions.  The traditional elements, ramped up just a bit.  Yum!

BTW, the soda bread is an adaptation (Of course; I rarely leave well enough alone!) of my mom's recipe.  I'll try to post that soon.

Tuesday, January 4, 2011

Stromboli

In October I made an elaborate Indian meal for David and his college friends, one of whom is vegan (no eggs or dairy, in addition to no meat).  Of course, I could have made pasta with tomato sauce or black beans and rice, or some other simple dinner.  But, no . . .

Anyway, one of our side dishes was stuffed bread--individual disks filled with spiced potatoes and carrots.  It was delicious!  Joseph commented that it would be great to have bread wrapped around a filling again, especially if that filling included meat.  He was describing stromboli.

Stromboli is a specialty of my sister's husband.  He usually makes it as a side dish for Christmas dinner.  I finally obtained a copy of the recipe and made some for my family.  Here's how it goes:
Thaw a one-pound loaf (or three!) of store-bought frozen bread dough.  Let it rise until doubled, or at least soft and puffy.
Roll out the dough on parchment paper that has been cut to fit a jelly roll (~11" x 17") pan.  Brush lightly with beaten egg.  I used two eggs for three loaves.
Start layering the filling.  The recipe calls for meat, cheese, meat, and cheese. 
I used turkey Italian sausage (Shady Brook Farms tastes best.  I use hot, which isn't spicy but has more flavor than sweet.), ham, and turkey pepperoni.  Provolone and sliced mozzarella were the cheeses of choice.
Leave room on a long side for rolling up and connecting the dough.
No, that's not Parmesan on the pepperoni--it's frost!  I keep my leftover in the freezer.
Each loaf was different:  sausage/pepperoni, ham/pepperoni, and sausage/ham (our favorite).
Use the parchment to help you begin rolling up the loaf.
It may be a bit of a struggle to keep the filling in!  Muscle it along as best you can, and seal the dough.
Pinch the dough together thoroughly.
Lay your stromboli, seam side down, on the parchment on a baking sheet with sides.
Brush with beaten egg and sprinkle with sesame seeds.  Bake at 375 for about 30 minutes.  Slice and serve.
Parchment saves clean up time, and the sides of the pan prevent disaster when the cheesy goodness inevitably leaks out.  I don't know if there's a correlation, but I used shredded mozzarella on one loaf, and that one leaked the most.
Len still likes pizza better, but this was a fun dinner.  I served it with ranch dip and warm tomato sauce on the side. 

The leftovers were even better:  we heated slices (on their sides) in a skillet (use cast iron or non-stick), getting them warm and crusty, then topped them with warm sauce, making a delicious knife-and-fork plateful.

Here's the general outline, summarized:
1# loaf frozen bread dough, thawed and risen
beaten egg
meat, 2 kinds, 1/4# each?
provolone and mozzarella, 1/4# each
sesame seeds, optional
dip or sauce, optional

Roll out dough.  Brush with beaten egg.  Layer with meat and cheese.  Roll up and pinch seam.  Brush with egg and sprinkle with sesame seeds.  Bake at 375 for 30 minutes.  Enjoy!

Thursday, July 29, 2010

Deluxe Eggs

Deluxe eggs have become a regular part of our Sunday morning repertoire. After 9:00 a.m. mass, we eat a big breakfast (brunch, really) of something baked (coffeecake, sweet rolls, biscuits, etc.) and something hearty (bacon or sausage or, nearly always, deluxe eggs). This is enough to keep us going until our early Sunday dinner.

What follows is more technique than recipe. Amounts vary by how many you're feeding, but the process remains the same.

Note that a non-stick pan is essential--it cleans up well, and is responsive to heat changes. Cast iron, usually a non-stick contender, holds its heat too well in this case.

Deluxe Eggs
sweet (Vidalia) onion, chopped
eggs (~1 1/2 per person)
bacon bits or chopped ham
grated cheese (We like a Mexican blend.)

Saute onions over medium heat in some butter or your favorite spread.Beat eggs in a bowl, crank the heat up to HIGH, and add the eggs to your pan.Sprinkle with (real) bacon bits or chopped ham.Let set a bit, then begin scraping and stirring.BEFORE the eggs are as done as you like, sprinkle them with grated cheese, turn OFF the heat, and cover the pan. In one or two minutes the cheese will be melted and your eggs will be perfectly done--not brown or rubbery or dried out (unless that's how you like them!).
These are great with something sweet (juice or coffeecake) and some heat (try smoked Tabasco). Enjoy!

Monday, January 18, 2010

Oven Fried Catfish and Chicken Parmesan

Here's a simple, tasty way to prepare catfish.Oven Fried Catfish
2# catfish fillets
~ 1/3 cup butter, melted
1/2 cup fine dry bread crumbs
1/2 cup cornmeal
1 Tbsp Old Bay seafood seasoning
  • Rinse fish and pat dry.
  • Combine crumbs, cornmeal, and Old Bay.
  • Set up an assembly line. Dip fish in melted butter, drain, and coat with the crumb mixture. Place on baking sheet.
  • Bake until fish is opaque and flaky. The timing depends on oven temperature; anything from 350-425 will work well.
Notes:
  • You can dip the fish in melted butter, margarine, oil, or a combination. Since I use Better Butter, which is whipped, the volume isn't accurate. This means I don't measure anymore, but guesstimate how much to melt.
  • To keep things tidy, it works best to use one hand for dipping only--don't touch the crumbs with it at all.
  • Catfish is thick and moist, difficult to overcook.
  • This recipe isn't appropriate for thin fish filets as the coating-to-fish ratio would be to high.
  • I like to keep some prepared fish in the freezer. Lay it on plastic wrap on a baking sheet, cover, and freeze. Then place two filets back-to-back, wrap in plastic, and store in a freezer bag. Thaw in the fridge on a baking sheet and bake as usual. This can also be the foundation of a give away meal--a change from the usual lasagna or chicken casserole.
  • I cover the baking sheets with heavy duty foil. My dish washers are appreciative. ;-)
  • Leftovers reheat well in a nonstick skillet over medium-low heat.
VARIATION: CHICKEN PARMESAN
I use the same technique to make chicken Parmesan:
2# skinless, boneless chicken breasts
melted butter
1/2 cup Italian style bread crumbs
1/2 cup grated Parmesan cheese
-
The chicken can be cooked on a baking sheet (like the catfish) or in a pan with sauce (serve pasta on the side). Grease a baking pan (9 x 13" or larger, depending on how much chicken you use) and pour in a jar of pasta sauce. Mix in a little bit of water (1/2 cup?), top with chicken, and bake uncovered. Again, the timing depends on your oven temp. You already know how to cook chicken, right?
-
This freezes well, just like the fish. I find that 2# of chicken has less surface area (smaller but thicker pieces) than 2# of catfish, so you may not need quite as much crumb coating. Measure scant amounts or freeze the crumbs for next time.

Sunday, December 27, 2009

Sausage Breakfast Casserole

Our family's traditional Christmas breakfast includes cinnamon rolls and some sort of eggs or meat. I like the idea of a make-ahead casserole, but until now hadn't found one that appealed to my taste. Most are filled with bread cubes and are quite eggy, just not our style.

Last spring my sister-in-law served this dish at my nephew's First Holy Communion reception. It contains a LOT of sausage, with potatoes instead of bread cubes, and just 4 eggs. It was hearty and flavorful, so I decided to try it this week.

I prepared steps 1-5 on Christmas Eve. Before leaving for mass in the morning I mixed the eggs, milk, and biscuit mix, and put the casserole in the oven. I set the oven on delay start (and at a temperature lower than the recipe suggests) so it would begin baking while we were at church. When we got home I pulled out the casserole, baked the risen rolls, and we soon settled down for a delicious brunch. I hope you like it as much as we did.

Sausage Biscuit Bake (Don Gaspar Inn, New Mexico)

2 # Jimmy Dean sausage (I used reduced fat)
1 # frozen shredded hash brown potatoes
1 # shredded Mexican cheese blend
4 eggs
2 cups milk (I used skim)
1 cup Bisquick (I used my version of Leila's homemade mix)
  1. Fry sausage in a large nonstick skillet, breaking it up as it cooks, until it has browned.
  2. Spread sausage into a greased 9 x 13" dish, leaving the drippings in the pan for the potatoes. (The reduced fat meat was so non-greasy that I added some oil to the pan for the next step.)
  3. Add hash browns to the pan and cook, stirring occasionally, allowing it to brown nicely.
  4. Add potatoes to the baking dish, gently mixing to distribute evenly.
  5. Top with cheese. The dish may be covered and refrigerated at this stage.
  6. In a bowl, lightly whisk the eggs, then add milk and biscuit mix. Pour over the sausage mixture and bake at 400*for at least 35 minutes (it may take 45-50 min.) until the center is set and a knife comes out clean (no raw egg). Allow to sit for 10 minutes before serving.
This was so easy and tasty that it may become a Sunday tradition--no need to wait until Christmas comes again!

Wednesday, September 16, 2009

Onion Soup

I don't know why I save onion soup for special occasions. It's relatively simple to make, and is one of Len's favorites. Maybe it's that I've never considered such a brothy soup hearty enough for a meal, so I tend to use it as an appetizer, and how often do I serve multi-course meals (Christmas, maybe)?

Tonight I served onion soup and chicken noodle soup for this season's Soup Night kickoff, and with salad and bread it WAS enough for dinner. Maybe I'll make it for one of our family's favorite simple meals: soup, artisan bread, cheese, and apples.

This recipe is based on Mollie Katzen's from her Moosewood Cookbook. The most obvious change is that I usually use beef broth. A quadruple batch made about 5 quarts, in case you were wondering.

Onion Soup
5 cups thinly sliced onions
2 cloves garlic, crushed
butter, as needed
1 quart stock or water (I use Swanson's 50% less sodium beef broth in a box)
1 Tbsp soy sauce (I use reduced sodium)
3 Tbsp dry white wine
1/2 tsp dry mustard
dash of thyme
a few dashes of white pepper
1 tsp honey
optional toppers:
skinny, dense French baguette
garlic cloves, peeled
shredded Italian cheese blend
  • Cook the onions and garlic, lightly salted, in the butter in a kettle. Cook them until very-but-not-too brown. Use medium heat to cook them gradually and thoroughly. I leave the lid on for a long time, then cook uncovered to evaporate the liquid and promote browning. Watch carefully and stir more frequently during the uncovered stage. The onions will decrease dramatically in volume.
  • Add remaining soup ingredients. Cook slowly, covered, at least 30 minutes.
You know how yummy onion soup is with bread and cheese broiled on top? Well, I don't have the correct bowls, so I improvise with this make-ahead variation:
  • Slice a baguette (it must be skinny and dense) at a slight angle, about 1/4 inch thick. Put the slices on a baking sheet and broil. Watch carefully, and turn them over with tongs to brown both sides. You'll need to monitor closely, because the pieces will be done at different times.
  • When all the slices are toasted, rub one side of each with fresh garlic.
  • Spread the bread on the baking sheet again. Cover with shredded cheese. I use an Italian blend, but provolone or Gruyere or whatever you like is fine. (I don't recommend something stringy like all mozzarella.) Bake (this way all the pieces will be done at once) in the oven until the cheese is melted and maybe even a little bit golden.
  • These goodies can be kept at room temperature and floated on top of your bowl of soup. We find that three or four slices fit nicely. They start out crunchy, but once they've soaked up some broth, the toppers can be cut and eaten with your spoon. Enjoy!

Friday, September 11, 2009

Pesto: Summer in a Bag


There's something cheery about serving pesto in February. That bright green, that summery smell--fantastic!
-
How to achieve enjoyment of this out of season treat? Well, you can buy pesto sauce in a jar (eh), or make your own with expensive grocery store basil. I prefer to harvest our basil, make several batches of sauce, and freeze it in small bags, which are easy to thaw and toss with pasta.
-
Elizabeth gave me this recipe many years ago. The only changes I've made are to put "Ever Fresh" in to save the bright color and to add some salt at serving time.
-
Pesto Sauce
2 1/2 cups fresh basil, washed then spun or patted dry
1/2 cup walnuts
4 large garlic cloves, pressed
1/4 cup extra virgin olive oil
1 tsp "Ever Fresh" or equivalent (ascorbic acid), dissolved in 1 Tbsp water
-
Put everything in the bowl of a food processor (a double batch fits well). Process until smooth. Store flat in pint-size freezer bags, being sure to press out all the air. To serve:
1 pound pasta (reserve 2 cups cooking water)
1/2 tsp salt, optional
2 ounces cream cheese, optional
1/2 cup Parmesan or Romano cheese, grated
  • Cook pasta in boiling water.
  • Meanwhile, thaw pesto in a container of hot water, then scrape into a serving dish. If desired, add salt and cream cheese. Mash and mix to combine, adding some pasta water as needed. Reserve more pasta water before draining.
  • Drain pasta and add to the sauce. Toss to coat, adding water as needed. Sprinkle with half the grated cheese, toss, add remaining cheese, and toss again. Serve with a smile.

Thursday, August 20, 2009

Bulgogi

Bulgogi is a classic Korean food, and perfect for summer grilling. It reminds me of an Asian taco: a lettuce "tortilla" filled with plain sticky rice and thin slices of marinated beef. The combination of crunchy, chewy, bland, and salty is fabulous!

A friend of mine was given this recipe by a Korean family she used to live near. The marinade ingredients can be tweaked to your taste.
-
One note: You need meat that is sliced quite thin. I get this (frozen) at an Asian market. It is called (at least here) "beef rib eye thin sliced" (see below).
A 2# package is about right for us.Okay, another note: This is best as a summer dish. Of course you can grill in the winter, but you've got to stand over it the whole time, and it's hard to see when the meat needs flipping in the dark of December. You can also broil, griddle, or saute the beef, but it's not as tasty.
-
Bulgogi
2# thin-sliced beef, thawed
3/4 cup soy sauce (I use reduced sodium)
2 Tbsp sugar
1 Tbsp sesame seeds
1 Tbsp minced garlic
1 large bunch green onions, minced (including stems)
romaine or leaf lettuce
2 cups white rice, cooked (jasmine is quick and sticky enough)
-
Combine soy sauce, sugar, garlic, and sesame seeds.
-
Place a single layer of meat in a casserole dish. Spoon a little marinade over it. Repeat layers until all meat and marinade are used up. See how skinny? I've had it even thinner, which is easier to eat (less chewy), but more fragile and thus more difficult to cook.Cover the dish and refrigerate several hours or overnight. The meat is so thin that starting in the morning gives it plenty of time to soak up flavor by dinner.
-
To cook, heat grill to high. Lay meat slices on grill. Turn once. If your grill is hot enough, you'll be able to starting turning as soon as you've laid out a full set of meat.
This former dietitian is still germ-phobic enough* to have an elaborate system involving paper towels and two spatulas to avoid cross contamination between the raw and cooked pieces, but I won't burden you with that description. ;-)
-
To serve, have a platter of lettuce leaves on the table along with a dish of rice and the platter of meat. People assemble their own food. We find it works best to have the meat on top of the rice, to help hold everything together.
Enjoy!
-
*My poor, deprived children are also not allowed to eat dough or batter containing raw eggs. Such a mean mommy!