Showing posts with label fruit. Show all posts

Wednesday, July 1, 2009

Sugar Free Fruit Pie

Technically these pies are not "sugar free"--they're actually "no sugar added". I was bringing dessert to a gathering that included some folks who may not eat added sugar, but I still wanted to provide something homemade. I also didn't want to try actually baking with a sugar substitute; I'll bet there's a big learning curve, and sugar contributes a lot to texture (not just taste) in baking.

Anyway, after much pondering (I know, I know--get a life!), I figured out a way to make my summer fruit pie without sugar. I made sugar-free jello, and when it had chilled to the thick and gloppy stage I folded it into 3 cups of fruit. This was poured into a baked shell and covered with a little more jello.
The strawberry pie was gorgeous and also sliced very neatly. The blueberry pie (I used raspberry jello) didn't hold together as well, probably because it was piled into the super slumpy shell. I also didn't have as much "glaze" for the blueberries. Or maybe their packed together roundness kept the jello from surrounding them as well as the slices of strawberry. It was still quite tasty!I must admit I made real whipped cream (with sugar) for those who were able to indulge. Please don't hold it against me. :-)

Another caveat: I'm not saying this is necessarily a healthful variation. It depends on what you're careful about: sugar vs. artificial colors and aspartame. I think this is an option for the right situation.

Tuesday, June 30, 2009

Cherry Cobbler

As I've written before, we pick, pit, and freeze the sour cherries from our tree. Since their juiciness and sourness can vary each year, I consider a pie to be too tricky to bake. Getting the filling just the right degree of sweet and thick (but not too thick!) requires a lot of guesswork.

That's why I prefer to bake cherry cobbler. It's essentially a pie filling topped with a sweet biscuit. Soupiness doesn't matter, and ice cream or whipped cream can smooth out any over-tartness.

Over the years I've combined and fiddled with recipes, never feeling confident that I had a sure winner. Well now I've found it--in Cook's Illustrated's The Best Skillet Recipes. This is a great new book, with simpler (i.e. easier) dishes than many of their others.

You can bake the cobbler in the skillet if you have a 12" one that is ovenproof. Otherwise, make the filling in a pot and transfer to a greased casserole dish before topping with the biscuit dough and baking. I'll try to remember to post a picture the next time I make this delectable dessert.

For the record, I only tweaked this recipe a tiny bit. Here you go:

Sour Cherry Cobbler
Biscuit Topping
1 1/2 cups flour
1/3 cup sugar
1 1/2 tsp baking powder
1/4 tsp baking soda
1/4 tsp salt
3/4 cup buttermilk
4 Tbsp (1/2 stick) unsalted butter, melted and cooled

Cherry Filling
3/4 - 1 cup sugar, depending on your fruit
3 Tbsp cornstarch
pinch salt
~4 cups canned or thawed sour cherries, drained, with 2 cups juice reserved
1/2 tsp almond extract
2 Tbsp coarse sugar
  • For the biscuit topping: Whisk dry ingredients together. Pour cooled butter into the buttermilk; it will make tiny clumps. Stir wet into dry just until a dough forms. Set aside.
  • For the cherry filling: Whisk the sugar, cornstarch, and salt together in a 12" ovenproof skillet. Whisk in the reserved cherry juice and cook over medium-high heat, whisking frequently, until the mixture simmers and is slightly thickened, about 5 minutes. Off the heat, stir in the cherries and almond extract.
  • Using a spoon, scoop and drop 1" pieces of the dough, spaced about 1/2" apart, over the cherry filling in the skillet, then sprinkle with the coarse sugar. Transfer the skillet to the oven and bake the cobbler until the biscuits are golden brown and the filling is thick and glossy, 25-30 minutes.
  • Using a potholder (The skillet handle will be hot!), remove the skillet from the oven. Let the cobbler cool for at least 15 minutes before serving.

Sunday, June 28, 2009

Summer Blueberry Pie

Blueberries are delicious, but I don't especially like them cooked. So I don't enjoy blueberry muffins, blueberry pancakes, or regular blueberry pie. That's why this cold version (similar to strawberry pie) appeals to me. It's also what makes it a summertime treat--FRESH berries are required.

I tweaked recipes from my aunt and from cookbook author Jane Brody to come up with my version. Simply bake a standard crust, make a sauce by cooking crushed blueberries with sugar, lemon juice, and cornstarch, fold in raw berries, and chill. It's fabulous plain or with whipped cream, and easy enough to make extra--one to give away or save for tomorrow. ;-)

Summer Blueberry Pie
1 quart (4 cups) fresh blueberries
1/2 cup sugar
1/2 cup water (plus more for the cornstarch)
3 Tbsp cornstarch
1 Tbsp lemon juice
9" pre-baked pie shell
whipped cream, optional
  1. In a medium pot, crush 1 cup of blueberries with the sugar. Add water and bring the mixture to a boil.
  2. Meanwhile mix the cornstarch with enough water to make a pourable slurry.
  3. After the berry mixture bubbles, remove the pot from the heat. While constantly whisking the berries, slowly pour in the cornstarch slurry. Return to the heat and continue to whisk and simmer until the mixture is clear and thickened. Remove from heat.
  4. Stir lemon juice into the berry glaze. Pour in the remaining three cups of berries, stirring with a rubber spatula until they are all coated.
  5. Spread filling into the pie shell and chill. Enjoy!
Notes:
  • For a strawberry variation, arrange 3 cups of berries in the pre-baked pie shell. Make the glaze and pour it over them. The strawberries need to be whole or halved--if you slice them, the gel will break and you will have strawberry soup!
  • You could substitute a graham cracker (or vanilla wafer or animal cracker) crust, if desired.
  • To pre-bake a regular pie crust, prick it all over (even on the sides) with a fork (this keeps it from buckling) and bake at 475 until golden brown, about 10 minutes. Although I will use store bought dough for quiche, I think it's worth the trouble to make my own crust for this pie. Baking it without any filling helps make the crust extra flaky:

Monday, January 12, 2009

Citrus Sections

Grapefruit and oranges are THE winter fruits--juicy, healthy, and at their best when the rest are NOT. (Fresh blueberries, anyone? I don't think so!) Many at our house like citrus fruit, but sometimes it's just too much trouble to actually consume it.

When I'm feeling generous (or am procrastinating in another life area or have just bought 15# bags of fruit from the big store) I'll prepare these citrus sections for the family.

Disclaimers: it's healthier to eat the fruit with membranes, and it can be time consuming to cut up so much fruit. BUT: It's so yummy and EASY to eat this way. This is also a nice special occasion salad, like for Sunday or brunch or breakfast in bed.

First cut the top off the fruit with a serrated knife. Then cut off the rest of the peel. Make sure you cut through the outer membrane/skin, exposing all the fruit. You won't necessarily waste a lot of fruit. Cut just barely through the skin. See how little grapefruit is left on the peel below?
The next step is hard to demonstrate with these pictures, but if you get this far in real life it should become clear. Hold the fruit in one hand and slide your knife down the inside of a section, between the fruit and the membrane.Turn or twist the knife, sliding upwards along the other side of the section, to push out a beautiful bite of fruit, leaving the section separators behind. Continue around the rest of the fruit. Eventually you'll be left with a hunk of membranes. There's a little fruit clinging to this, so squeeze the juice into your container.Make just enough for right now, or stock up if you have the time. Properly sealed, this fruit will keep for several days in the fridge. We've never had any last longer than that. :-)
-
A big bowl of citrus sections:An even bigger pile of peels!
BTW, I think 2 oranges per grapefruit makes a nice mix.

Saturday, December 6, 2008

Pomegranate Tutorial

I'm not a big fan of pomegranates (too seedy!), but the rest of the family really likes them. They're a seasonal treat, showing up around November to December.

I learned from Sunset magazine how to prepare them neatly for easy eating. The key is to do most of the work under water to keep the bright red juice from splattering all over.

First I cut the fruit into quarters through the skin. I pull the quarters apart under the water.
The seeds are in little compartments separated by papery walls. Just rub them gently to dislodge. The juicy seeds sink to the bottom while the waste pieces float on top for easy removal.Notice that the water is not as clear as at the beginning? It's discolored from all the juice that did NOT spray on the wall, the coffeemaker, and my shirt!Pour off the floaty bits, rinse, pour off again, and drain.Scoop into your serving bowl and enjoy.
Thursday, November 20, 2008

Hot Spiced Cider

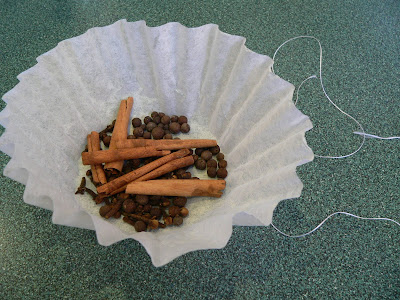
Just the thing for a cold afternoon, this recipe is based on the one from Alice Cantrell's Tea & Cake With the Saints: A Catholic Young Lady's Introduction to Hospitality and the Home Arts.

2 quarts apple cider
2 cinnamon sticks
1 tsp whole allspice
1 tsp whole cloves
(For 1 gallon of cider, just increase to 3 cinnamon sticks and 1 1/2 tsp each allspice and cloves.)

Break the cinnamon sticks once or twice. Combine with other spices in a small piece of cheesecloth or a coffee filter. Tie with UN-waxed dental floss. Float with cider in a saucepan, bring to a boil, and keep warm.
This can also be heated in a crockpot. I don't usually have all day, though, so I microwave it in the insert until the cider is hot, then just keep it warm in the crockpot.

I like to use the rustic cider (vs. the clear bottled kind), but prefer to decant from the jug without shaking it. Too many particles seem to cook together into unappetizing clumps.

Tuesday, September 23, 2008

Plum Crisp

I'm still buying big boxes of Italian plums, but we can eat only so much kuchen. Next on the agenda: plum crisp.

I adapted the filling from a recipe on epicurious, and covered it with my favorite crisp topping.
Topping:
3/4 cup butter
1 cup plus 2 Tbsp light brown sugar
1 1/2 cups oatmeal
1 1/2 cups flour

Melt butter. Add remaining ingredients. Mix thoroughly and spread in 9 x 13" pan. Bake at 350* until golden brown, stirring every 10 minutes (~30 min. total). Set aside (it will crisp as it cools).

Filling:
3 pounds Italian prune plums (~44)
1/2 cup sugar
3/4 cup water
4 tsp cornstarch
  • Halve and pit plums. Cut into 8 chunks each.
  • In a large skillet cook plums and sugar over medium heat, stirring, until sugar is melted.
  • Combine water and cornstarch in small bowl or mixing cup. Stir into plum mixture and simmer, stirring, until liquid clears and thickens.
  • Pour into 9 x 13" pan and bake about 30 minutes at 350*.
  • Remove from oven. When mixture stops bubbling (or later), sprinkle with topping. Serve warm or cold.
Below is the filling shortly after removal from the oven:And here is the completed crisp:Okay, I can hear the complaining already: "Why should I bother to cook the topping separately? What a hassle! Why is she so picky? I always top the fruit before baking." Well, friends, I made my first batch the old way, and this is what it looked like:
Not so pretty, huh? As the fruit cooked, it bubbled all over the topping. Most of it was gooey and chewy rather than crisp and light. (It didn't help that I made too much topping in the first place.) Cooking the streusel separately is well worth it, and isn't much extra effort. It can even be done (in its own pan) at the same time the fruit is cooking. Opening the oven to stir isn't a problem.
Additional notes:
  • You can add 1-3 tsp cinnamon to the topping.
  • I made this twice, and had 43 and 44 plums in 3 pounds. Your plums' sizes may vary, so weight is a more reliable measure. If I make this again soon I'll try to remember to record the volume (in cups) of cut fruit.
  • If there is more topping than you care for, don't sprinkle it all on the plums. Keep the extra in a container (mine is in the fridge) to sprinkle on ice cream or applesauce or whatever. It's hard to go wrong with brown sugar and butter...
  • UPDATED 9/26: We (Joe and Marianna helped) made another today and had 8 cups of cut fruit.
  • Another lesson learned the hard way: If you're going to take this to a friend's house, wait to put the topping on when you get there so the jiggling in the car doesn't make it sink. Waah...

Tuesday, September 2, 2008

Oma's Plum Kuchen

When those Italian plums (prune plums) show up in the grocery store in late summer, I always think of Oma. She had a dough recipe that she used for making sticky buns, pineapple rolls, and most importantly, plum kuchen (koo-ken). She was a loving grandmother and a great cook, and was so generous with her time and talent. (Among other things, she made me some special birthday cakes and gave me the cake decorating bug.)

I hardly ever buy the plums or try to bake with them myself, but this year I went crazy and bought a five pound box at Costco! Let me tell you, that is A LOT of little plums! I came home and almost desperately prepared a batch of kuchen. Yum! I finished the box a few days later with another 1/2 batch, which is documented below. I've adapted it a bit, as is my usual practice (can't leave well enough alone...). Enjoy.

By the way, there are many kinds of kuchen. This one is essentially bread and fruit, and is only lightly sweetened. I think some are much sweeter and cakier in texture, but this is the kuchen I've always known and loved.

Kuchen
2 cups milk
2 pkgs yeast (4 1/2 tsp)
2 Tbsp instant potato
4 Tbsp butter
1/2 cup sugar
1 1/2 tsp salt
6-7 cups flour
1 egg
Italian plums (40-50)
cinnamon sugar
  • Heat milk to 105-115* and pour some into the mixing bowl of a stand mixer. Add instant potato and yeast and stir to dissolve.
  • Add butter to the remaining milk and heat just enough to melt the butter. Add sugar and salt, stir, and set aside to cool slightly.
  • Add some flour to the yeast mixture and mix on low speed. Add egg and some more flour and continue mixing. Gradually add the warm milk/butter mixture and continue mixing. Continue adding flour in small amounts (speed 2 on Kitchen Aid) until the dough is smooth and leaves the sides of the bowl. Let it continue mixing for 2 more minutes.
  • Turn dough out and lightly oil the mixing bowl. Form the dough into a ball and put it back into the bowl, turning it over so all surfaces are greased. Cover with plastic wrap and let rise until double in size (40-80 minutes). Punch down dough and let it rise 2 more times.
  • Punch down the dough a final time, and turn it out onto a lightly floured surface. Let it rest while you grease your pans. Roll out the dough (it will be thin) and place in pans.
  • Sprinkle dough with cinnamon sugar, cover with plum halves (skin side down), and sprinkle again with cinnamon sugar. Let rise again, then bake at 350* for 25 minutes. Best eaten warm!
  • Yield: 7 round cake pans or 2 (~11 x 17") jelly roll pans/baking sheets with sides

Notes:

  • Most of the dough ingredients can be added in any order. Just don't add the salt to the initial yeast mixture, and don't add the hot milk/butter until there are enough other ingredients to stop that heat from overwhelming and killing the yeast.
  • Quicker rising: Boil water in the microwave (in a Pyrex measuring cup). Leave the cup of water in there and put in the mixing bowl of dough. It's now in a very warm, humid environment.
  • The second and third rises are much quicker than the first. Be ready.
  • The dough may have to rest now and then during rolling out. You'll know because it will keep pulling back and resisting your stretching. Leave it for a few minutes until it is cooperative again.
  • The first time, I misread the recipe and baked the kuchen at 375* for 20 minutes. It was just as good.
  • Oma's recipe said the dough would be less than 1/2", but I was nervous because it was MUCH thinner. This picture doesn't do it justice--I'll bet it was below 1/4".
Here's a picture of a panful of dough and fruit. The fruit looks HUGE on the thin layer of dough--don't worry! All will be well. (The white stuff in the lower left corner is sparkle sugar I added. Don't bother--most of it melted, and what remained wasn't worth the effort.)
Below is the unrisen dough with raw plums on it. Notice how much of the pan sides you can see.
See the puffiness now just before going into the oven.
And the extra rise from baking. Don't the plums look luscious now?
Kuchen is best eaten warm from the oven. It is also excellent the next day for breakfast (wrap tightly), IF you microwave it for a few seconds to freshen it up.
Thanks, Oma, for all the love.

Wednesday, June 18, 2008

Tools of the Trade: Cherry Pitters

For pitting soft cherries like the sour ones on our tree I use this heirloom tool made by Opa with, yes, a hairpin. I insert the metal loop in the dimple where the cherry stem used to be. I push it down alongside the pit, and pull the pit back out the top. It's a simple, neat solution.
If you don't have a tool-making grandfather available, just unfold a large paperclip. The narrower end is just right for the pits in our small fruit.
For firm cherries (think Bing), the pit is pushed out. The cherry (or olive) rests in the bowl at the bottom, dimple side up.
Squeeze the handle and the post pushes the pit right out through the bottom of the cherry. It is SO easy, the fruit stays in great shape, and nothing is left clinging to the pit.
I am not generally a fan of one-trick kitchen gadgets (banana tree, garlic holder, mushroom brush), but this tool was I gift I still love and make room for. Fresh cherries have a short season, and for most of us it's no big deal to eat them and spit out the pits. But what about cherries for your toddler? Or would you ever bother putting cherries in fruit salad or serving them at a party? I've done both. Besides, it's really fun to pop out those pits. Everyone wants a turn. ;-)


I was just looking for this pitter online, and found one that even has a splash guard! Mine is unguarded, so I do hold it down in the sink or a bowl when pitting, because there is much splashing of potentially staining juice.

Tuesday, March 18, 2008

Charoseth

This chopped apple salad is used at our Passover Seder to symbolize the mortar and bricks the Israelites were forced to make as slaves in Egypt. It is good year-round with any roasted meat or poultry. The amounts are flexible--mix, taste, and adjust. (The amount of honey depends on the sweet/tartness of the apples.) I don't think I would make this without my food processor.

Charoseth
1 cup raisins
1 2/3 cups walnuts
3# firm, crisp apples (about 6 medium)
1 Tbsp cinnamon
honey, to taste
  1. Process raisins until they form a single mass. Transfer to a large mixing bowl.
  2. Process nuts until ground (medium texture). Add to the mixing bowl.
  3. Quarter apples and cut out cores (do not peel). Grate with the french fry attachment or other grating disc. Add to the raisins and nuts.
  4. Sprinkle with cinnamon and drizzle with honey. Mix with your hands (those raisins need help de-clumping). You'll now want an assistant to add more cinnamon or honey if needed.
  5. Transfer to an attractive bowl and refrigerate, covered, until serving time. Leftovers will keep for a day or two in a tightly covered plastic container. The cinnamon disguises any browning of the apples.

Sunday, February 3, 2008

Crisp Topping

This is a versatile topping for fruit crisp. For apple crisp, we put a standard apple pie filling (like Betty Crocker's recipe for a 9" or 10" pie) into a 9" glass square pan, then sprinkle this on top. I've adapted the recipe from one in Some Like it South! by the Junior League of Pensacola, Florida.

1/2 cup (1 stick) butter, melted
3/4 cup brown sugar
1 cup oatmeal
1 cup flour

Combine and crumble over fruit. Bake at 350 degrees until fruit is tender and topping is brown; check at about 35 minutes.

Notes:
  • Even if you love crisp topping, do NOT increase the amounts! I've already done it! I gave this recipe to my sister years ago, and she automatically increased everything, forgetting that great minds think alike. She wondered why the fruit/topping ratio was so low. ;-)
  • This is a good give-away dessert. When I'm taking a meal to a family, I avoid giving them dishes that need returning. I put the pie filling in a plastic freezer bag, and the topping in another bag, along with instructions. The family can dump them into the pan and enjoy the smell of a warm dessert, too.